Car Rig Cinematography: Safety, Vibration & Shot Plans
Executive Summary
Vehicle-mounted cinematography is a stunt-tier discipline that lives or dies on three pillars: layered mechanical safety (never single-point mounts), rigid low-flex geometry (before any electronic stabilization), and disciplined shot planning (process trailers, "poor man's process," and camera cars chosen deliberately). This guide covers professional hardware (suction cups, speed rail, hostess trays, gimbals), vibration control from suspension bounce to drivetrain hum, interior and low-budget solutions, and the workflow, monitoring, and data management that keeps car days on schedule.
Table of Contents
- Safety First: Risk Assessment, Legal Compliance, and On-Set Protocol
Capturing compelling footage from, in, or around moving vehicles presents unique challenges that blend cinematography with complex engineering and rigorous safety protocols. This guide focuses on the practicalities of professional vehicle-mounted cinematography, emphasizing safety, vibration control, and meticulous shot planning. For a complete overview of the entire cinematography process, from camera tests to final deliverables, see our Full guide: Cinematography Pipeline Guide: From Camera Tests to Deliverables.
Modern productions treat car-mounted camera work with the same seriousness as any other stunt. This means comprehensive risk assessment, adherence to strict legal compliance, and established on-set protocols are paramount. The goal is always to achieve the director's vision while ensuring the safety of cast, crew, and the public, all while delivering stable, high-quality images.
Safety First: Risk Assessment, Legal Compliance, and On-Set Protocol
Any camera work involving moving vehicles, whether a simple hood mount or a complex chase rig, must be approached with a "stunt first" mentality. Professional productions, particularly those operating under union guidelines or with significant budgets, integrate vehicle-mounted shots into the same rigorous risk assessment process applied to traditional stunts. The same layered redundancy principles from rigging safety fundamentals apply directly to vehicle mounts. This includes hazard analysis, defined speed limits, road lockups, detailed emergency plans, and the involvement of specialized personnel such as a stunt coordinator, key grip, and transportation captain.
A formal, written safety plan is non-negotiable. Weather contingencies, route changes, and abort protocols should mirror the standards in crisis and safety management. This document typically includes a shot-specific risk assessment that identifies potential traffic risks, the possibility of rig failures, and environmental factors like weather. It also specifies maximum speeds and braking limits for the vehicle carrying the rig, and crucially, establishes a clear communication protocol. This usually involves a dedicated radio channel and standardized language like "roll," "cut," and "stop." A designated safety officer or the 1st Assistant Director (AD) is empowered to stop the shot at any time if safety is compromised.
Limiting personnel within the picture car during rigged shots is another critical safety measure. Only essential individuals, the driver (often a stunt or precision driver), actor(s), and sometimes a safety spotter, are permitted. Everyone inside the vehicle receives a thorough briefing on emergency procedures. Precision drivers are preferred for their experience in performing while handling altered vehicle dynamics and increased weight. Furthermore, professional shoots prioritize closed roads with police lockups or utilize controlled environments like backlots or large parking lots for complex rig setups.
Personal safety gear is mandatory. Seat belts must be worn at all times unless the narrative or blocking explicitly prevents it, in which case additional mitigation measures, like reduced speed, are implemented. Helmets and harnesses are required for exposed positions, such as those on hostess trays or side-riding rigs. For crew working around moving vehicles between takes, high-visibility clothing and hard hats are standard.
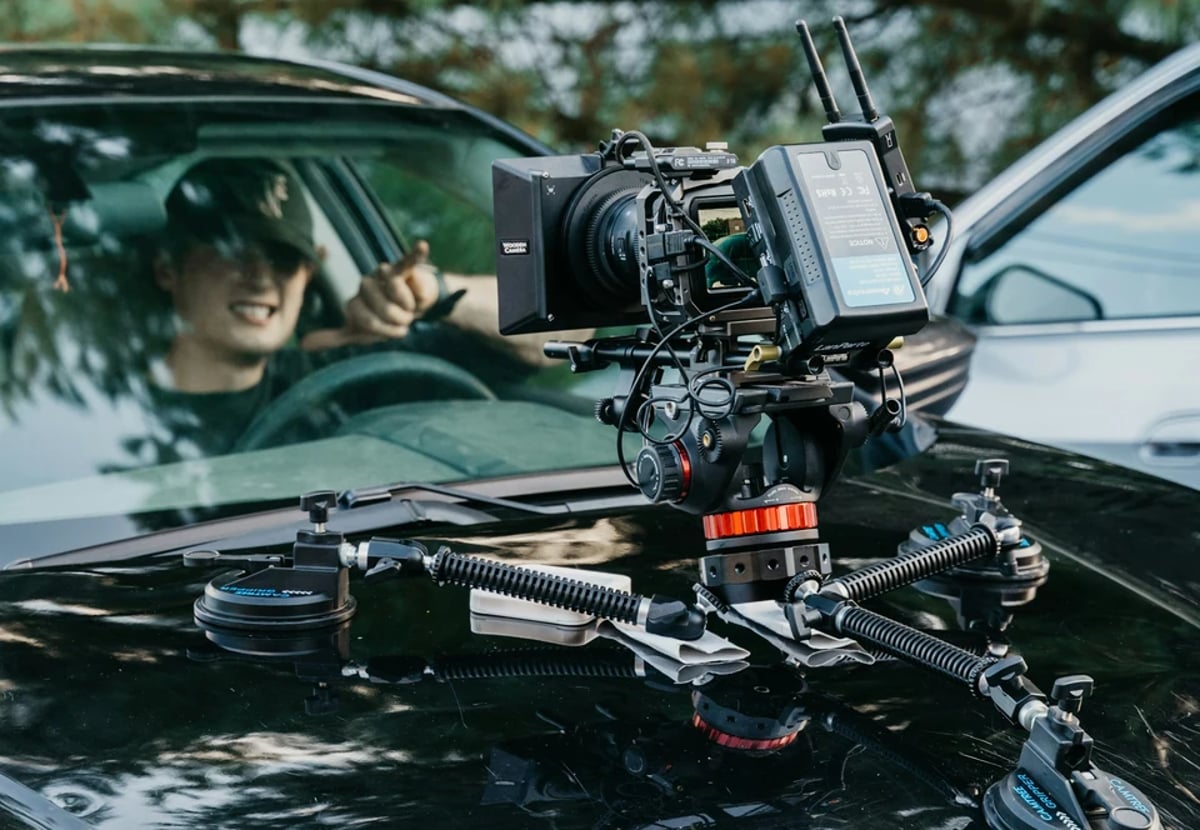
Professional car mounts, such as commercially available hostess tray systems and side mounts, are engineered for safe, secure installation. These systems provide specified load ratings and multiple tie-down points. Suction mounts, typically using 6-inch or 10-inch vacuum cups with built-in pumps and safety indicators, are combined with speed rail systems (aluminum pipe, commonly 1¼-inch or 1½-inch diameter) to construct robust frames over hoods, roofs, or sides. Crucially, all professional rigs incorporate safety straps and secondary retention like rated ratchet straps secured to vehicle hard points (frame, tow hooks, roof rails), and steel safety cables or chains tied to independent anchor points.
Common Mistakes
Treating car work as casual B-roll instead of a stunt-level setup. Relying entirely on suction cups with no secondary safety. Mounting rigs to weak body panels (plastic bumpers, thin sheet metal, sunroofs) instead of structural points. Failing to test rigs at low speeds before full-speed passes. Not documenting maximum speeds for a rig based on its weight, placement, and the specific road conditions.
💡 Pro Tip: Conduct a short, focused safety briefing before every car move. Confirm the route, turnaround points, and emergency pull-over signals. Clearly establish that anyone can call "stop" if they perceive a hazard, though only the director or 1st AD typically calls "action."
Car Rig Hardware: Professional Mounts, Speed Rail, and Support Systems
Effective car rigging starts with a clear understanding of the camera package. The process begins by considering the camera body and lens weight, the desired shot position and framing, and the intended path of travel and speed. Only then should the mounting hardware and support systems be chosen, ensuring they can safely withstand the anticipated load and dynamic forces (cornering, braking, acceleration).
Modern professional practice relies heavily on modular grip systems. Speed rail forms the structural backbone for arms and frames, connected by cheeseboro or swivel clamps. Camera mounting is achieved through ball heads, dedicated camera plates, and vibration isolators. The goal is always to keep rigs as compact as possible and close to the vehicle's structure. Long, cantilevered arms amplify vibration and increase risk; shorter, braced constructions that maintain a low center of gravity are preferred.
Hostess tray assemblies are a staple for classic "driver talking to passenger" shots, allowing the camera to ride beside the driver's window. These units feature adjustable widths for various car doors, multiple tie-down points for ratchet straps, and high-friction surfaces for securing camera plates. Professional suction-based car mounts typically employ three or four triangulated suction cups, often with integrated ball heads or Mitchell plates, and include pump indicators for secure installation.
For more extensive setups, grip departments utilize speed rail to construct "goalpost" or "T-bar" rigs over hoods, roofs, or trunks, incorporating cross-bracing to minimize flex. On larger productions, rigs may be mounted to forklifts or cranes, allowing camera arms to sweep through open car windows or across rows of parked vehicles in continuous, dynamic moves. These heavy-duty systems are designed for substantial payloads and are readily available from specialized rental houses.
Current industry best practice often involves a combination of these elements: suction mounts for initial positioning, speed rail for structural integrity, and ratchet straps and safety cables for critical redundancy. This layered approach has become standard on professional vehicle-mounted setups, providing much greater security and stability than single-point mounting solutions.
Common Mistakes
Overloading small suction mounts with heavy cameras and long lenses. Under-bracing long speed rail arms, leading to excessive flex and bounce. Mounting to paint or thin panels that deform under load. Ignoring dynamic loads, such as braking forces, which can exceed static load ratings and compromise the rig's integrity.
💡 Pro Tip: Always build in triangulation when constructing rigs. Arranging supports so that forces are distributed in triangles dramatically increases rigidity and reduces flex, especially important for dynamic car work.
Vibration Control and Image Stabilization
Achieving stable, clean footage from a moving vehicle requires a multi-faceted approach to vibration control. The most effective strategy combines mechanical isolation with electronic stabilization. Mechanical isolation involves careful rig geometry and vibration-damping mounts, while electronic stabilization includes in-body image stabilization (IBIS), optical stabilization (OIS) in lenses, and the use of gimbals or stabilized heads for more dynamic moves.
The first step in vibration control is to minimize flex and movement in the rig itself before applying electronic stabilization. Experienced grip crews view stabilization as the final layer, not a solution for poor rigging. This means shortening arms, tightening all connections, adding cross-bracing, and positioning the camera as close as possible to the vehicle's hard points.
Testing the rig at the target frame rate and shutter speed is crucial. Micro-vibrations that might be imperceptible at 24 frames per second (fps) can become noticeable at higher frame rates or shorter shutter angles. Therefore, professionals always test the rig under the actual shooting settings to identify and address any issues.
Many modern mirrorless and cinema cameras now feature in-body image stabilization (IBIS), and both cine and still lenses offer optical stabilization (OIS), which can effectively mitigate high-frequency vibrations. For more complex, dynamic shots, 3-axis gimbals designed specifically for vehicle mounting (often with hard-mount kits) are commonly employed. These units are built to handle the weight of cinema camera payloads and are available from major manufacturers and rental houses.
Mechanical isolators, such as arms or plates utilizing rubber or spring-based suspension, are frequently paired with suction or speed rail rigs. These components are designed to filter high-frequency vibrations that transfer from the car body to the camera plate, ensuring a smoother image. On high-end productions, fully stabilized chase camera rigs combine heavy-duty arms, sophisticated dampening systems, and professional camera stabilization to achieve exceptionally smooth tracking at speed, a common requirement for action sequences and car commercials. Even "oldschool" setups with two cameras ratcheted to a hostess tray benefit from shared stabilization and robust rigging to capture simultaneous angles efficiently.
Common Mistakes
Relying solely on IBIS or OIS to compensate for significant suspension bounce or poorly constructed rigs. Failing to isolate the camera from engine or drivetrain vibration when mounted near the hood or frame. Using consumer-grade suction mounts or gimbals beyond their rated loads or speeds. Neglecting to regularly check damping mounts for wear and tear, such as compressed rubber or loosened springs.
💡 Pro Tip: Differentiate between low-frequency (suspension-related) and high-frequency (engine/drivetrain) vibration. Address low-frequency issues by adjusting driving style, route, and tire pressure. Tackle high-frequency vibration with mechanical isolators and electronic stabilization systems.
Shot Planning and Coverage: Designing Safe, Efficient Car Sequences
Effective car sequences are meticulously planned, often using storyboards and overhead diagrams to previsualize every detail. Blocking logic borrows heavily from the definitive guide to camera movement and blocking and the crew choreography discipline covered in camera movement execution. This includes the exact positions of camera cars and picture cars, their paths of travel, turnaround points, and emergency escape routes. The specific type of rig (e.g., hood mount, hostess tray, interior handheld, exterior tracking) is determined for each shot, aligning with the narrative and aesthetic requirements.
A critical decision in shot planning involves choosing between real driving, using a process trailer, or employing "poor man's process." This choice is dictated by factors such as the actors' performance needs, the required level of safety, budget constraints, and the ability to control the shooting location. A typical car sequence will layer coverage, moving from wide tracking shots (often from a chase vehicle or crane) to medium shots from a hostess tray or hood mount, then to close-up interior coverage (perhaps handheld or with a small gimbal), and finally to inserts like hands on the steering wheel or gear shifts.
Process trailers are specialized tow trailers that carry the picture car, allowing actors to perform without actually driving. The towing vehicle handles navigation, making this a long-established industry solution for complex dialogue scenes, night work, or situations where actors cannot safely drive. Conversely, "poor man's process" is a common low-budget technique where the car remains stationary on a stage or in a parking lot. Exterior lighting simulates movement, and backgrounds are either displayed on LED screens or kept abstract. Even in these contexts, DIY rigs using professional-grade suction mounts and speed rail are frequently employed.
Dedicated camera cars, often extensively modified vehicles with platforms and mounting points, are used to carry operators, stabilized heads, and safety spotters. Alternatively, standard vehicles can be temporarily rigged with speed rail for this purpose. For particularly complex moves, such as those involving multiple vehicles, productions may use forklift-mounted camera arms that can extend through several parked cars' windows to create unbroken, sweeping shots. This approach reflects a growing trend of adapting industrial equipment for controlled, intricate car-related cinematography. Supporting these operations are three-ton camera and grip trucks, which carry heavy-duty mounts, stabilized systems, speed rail, and other essential rigging hardware, forming the backbone of serious narrative and commercial car shoots.
Common Mistakes
Overcomplicating rigs for simple shots instead of opting for a more controllable environment like a process trailer or "poor man's process." Not allocating sufficient time in the schedule for rigging and de-rigging between setups. Planning car shots without considering local traffic laws, police permits, and noise restrictions. Failing to coordinate camera and blocking to minimize reflections and the visibility of rigs (e.g., rigs seen in windows, incorrect actor eyelines).
💡 Pro Tip: Design shots around the strengths and limitations of available rigging. Experienced cinematographers and grips often adjust camera angles to align with where rigs are easiest and safest to mount, or subtly alter blocking and camera positions rather than forcing a risky or overly complex rig.
Interior Car Work, Process Shots, and Low-Budget Solutions
Filming inside a car cabin presents its own set of challenges, primarily related to limited space and the need for unobtrusive setups. Interior camera rigs must be compact, ensuring minimal intrusion into the driver's space, a clear line of sight out of windows, and absolutely no obstruction of vehicle controls like the gear shift, steering wheel, or pedals. Productions increasingly opt for smaller, lighter cameras and gimbals inside cabins to reduce rig size and weight, facilitating more flexible and less invasive camera placement for medium and close-up coverage.
For dialogue-heavy scenes, balancing realism with control is key. Many productions choose process trailers or "poor man's process" to allow actors to focus on their performance without the demands of actual driving, relying on simulated movement for the background. However, even on independent productions with tighter budgets, robust interior setups are achievable. Working DPs and grips frequently build DIY rigs using professional-grade suction mounts, speed rail frames, and hostess trays. Compact bracket systems that attach to seat rails, dashboard hard points, or roof handles are also common.
Hostess trays, traditionally used for exterior side mounts, can be adapted for interior use near windows or combined with suction mounts on the dashboard or windshield for multi-camera coverage. For highly subjective or dynamic interior shots, operators might ride in the passenger or rear seat with handheld cameras. Body-mounted rigs can also be employed for actors in tight cabins, especially in low-speed or stationary conditions. The use of dual-camera setups on hostess trays or interior rigs to capture cross-coverage for dialogue has been a standard and efficient practice for years. Even on lower-budget projects, the emphasis remains on prioritizing safety and redundancy, even when constructing DIY builds from readily available grip equipment.
Common Mistakes
Overcrowding the car cabin with rigs, which restricts actor movement and performance. Forgetting to secure all loose items inside the car before driving, creating safety hazards and potential continuity errors. Neglecting sound considerations, such as rigs that rattle or transmit road noise into microphones. Failing to control reflections, leading to crew, rigs, or lights being visible in windows or mirrors.
💡 Pro Tip: For interior car work, always rent professional, film-rated suction cups and clamps, even for DIY builds. Consumer-grade camera mounts lack the verified load ratings and safety features essential for vehicle-mounted applications.
Workflow, Monitoring, and Data Management for Car Rigs
A critical component of successful car rig cinematography is a well-defined workflow for monitoring, power, and data management. Reliable monitoring is essential for both operators and safety personnel. This typically involves monitors in a chase car or camera car, with wireless video transmission to the director, DP, and focus puller. Clear labeling of wireless frequencies is vital to prevent interference.
Power management is another key consideration. Productions plan for battery swaps to occur between takes rather than mid-drive, and cable routing is meticulously managed to avoid moving parts, pedals, or the steering wheel. After car work, immediate data wrangling is standard practice. Memory cards are offloaded promptly, and the media is reviewed for any stabilization issues, rolling shutter artifacts, or compression problems before rigs are struck. This allows for immediate identification and correction of issues.
Professional wireless video systems, with specified ranges and low latency, are mounted on car rigs for real-time monitoring. On-set logging software is used by script supervisors and DITs to record vehicle shot numbers, rig configurations, and any notes regarding vibration or safety issues that might impact reshoots or pickup planning. Production teams also utilize time-conversion calculators to accurately break down drive times, rigging durations, and potential overtime, aiding in precise budgeting for vehicle days and rigging schedules.
Common Mistakes
Mounting monitors in locations that distract drivers or obstruct their sight lines. Running unprotected cables through door frames or across moving suspension components, which can lead to damage or safety hazards. Failing to coordinate between the camera department and transportation regarding battery charging, power needs, and the load on the vehicle's electrical system. Not reviewing footage quickly enough to catch vibration or rig problems while the setups are still available for adjustment.
💡 Pro Tip: For complex car moves, DPs and operators should monitor from a chase vehicle rather than inside the picture car. This allows them to focus entirely on the image and the nuances of the shot without the distractions of being inside the performing vehicle.
Interface & Handoff Notes
Upstream Inputs:
Downstream Outputs:
Top 3 Failure Modes:
2. Unstable Footage from Vibration: Failure to properly isolate the camera from vehicle vibrations (low-frequency suspension bounce, high-frequency engine hum) due to poor rigging or inadequate stabilization.
3. Lack of Communication/Coordination: Miscommunication between departments (grip, camera, transportation, stunts) leading to safety hazards, delays, or missed shots.
Browse This Cluster
- Cinematography Pipeline Guide: From Camera Tests to Deliverables
Next Steps
Ready to see how this fits into the bigger picture? Start with the complete guide.
📚 Complete Guide: Cinematography Pipeline Guide: From Camera Tests to Deliverables
---
© 2026 BlockReel DAO. All rights reserved. Licensed under CC BY-NC-ND 4.0 • No AI Training. Originally published on BlockReel DAO.